
 When you see this symbol, click to read related discussion in the Forum. When you see this symbol, click to read related discussion in the Forum.
We've been bad.
The lumber truck showed up first thing Monday morning with the 5/4 stock that I ordered for door jambs and nice clear 3/4 pine for trim. This was supposed to be our signal to get back to work inside.
But we didn't. The weather's just been too beautiful. So we ignored all that nice new wood and kept working outside, mainly on the upstairs screened porch.
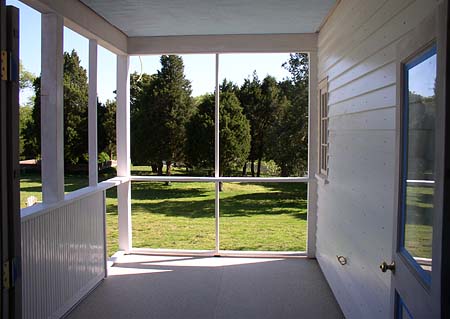
The porch is pretty much done now except for the top coat of paint on the ceiling and some trim. We had intended the half wall on the left to be sided, but I'm starting to get really stingy with our remaining long pieces of siding. We have tons of 8 and 9-foot lengths, but a diminishing number of longer sizes. This half wall would have eaten 7 eleven-foot clapboards, so we covered it instead with leftover beadboard. (Yeah I know, I thought I had installed my last beadboard, too.) It looks really good, so I think it was a good move.
So will we be good and get back to work indoors tomorrow? Well, there is the other side of that half wall that really needs siding... -- Bill
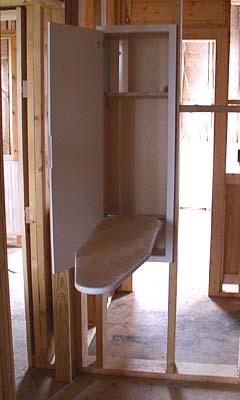
This may be the best $168 that we've spent for the addition so far. Our new built-in ironing board. I installed this in the master closet today and will look forward to ditching our old ironing board. The cabinet even has a metal-lined shelf designed to allow you to put the iron away while it's still hot without worrying about burning the house down. You can get all sorts of add-ons like a built-in light and power outlet; ours is the bare-bones model. We already have an outlet just outside the photo on the right.
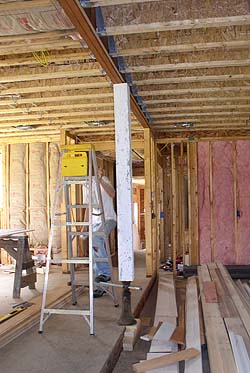
I've been continuing to work on building and trimming out door jambs, but it doesn't make for very exciting Web updates. One is just like the next, which is just like the next. Except that no two of them are the same size.
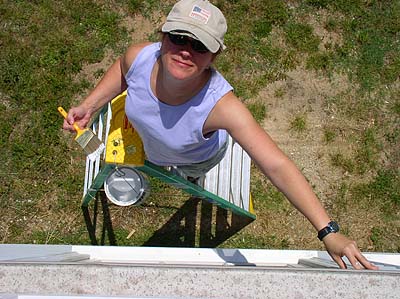
Meanwhile, Gay's been following along behind me, priming and painting. -- Bill
Remember our wildflower field? Well, this is its third year and it's right pretty. It's not as dense with flowers as I'd like, but there are lots of them in there among the weeds.

Lots of daisies, sweet Williams, and other flowers I can't name.
That's a lotta wood shavings!
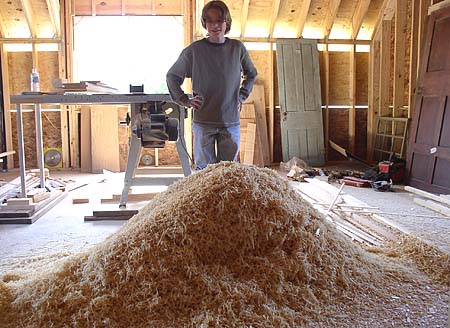
The other day I had to plane down a bunch of pine 1 X 4s to 1/2". Whatta mess. We hauled it out and used it as mulch around some plants...like the damn fig bush. Which once again is trying desperately to make something of itself this year.

In more important news...all 9 of the door frames upstairs are completed! I have just a few more small projects up there to finish and then the second floor will be ready for the plasterer. (Which does not necessarily mean that the plasterer will be ready for us.) Downstairs I only have 6 door frames to build and trim out, so hopefully things will move along a little more quickly when I move down there. But considering that we've only been working on inside trim for a month now (with a break to work on the back porches), I'm pretty happy with the speed of our progress. -- Bill
I hated to slow things down by adding a new project to the list, but the master linen closet has been bugging me and I figured it was now or never.
The closet has a short door and a tall ceiling, making the top three feet pretty much unreachable. So I framed a lower ceiling for the closet and created a large storage cabinet above it.
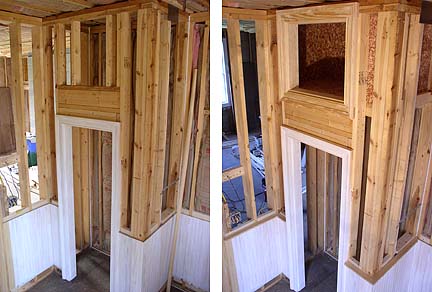
I lined the cabinet with 1/4" aromatic cedar chipboard, so it'll be a great place to store blankets and stuff off season. The chipboard is about $22 for a 4' X 8' foot sheet. (Warning: It has a right side and a wrong side. ) (Warning 2: Working with armotic cedar can give you a killer headache.) I made doors for the cabinet, but need to get some hinges before I can install them.
There are a couple other places where I see opportunities to do something cool with some otherwise wasted space. But at the same time I'm trying to shorten my to-do list, rather than add to it. -- Bill
Well, the "faux beam" is history. For a couple reasons.
First, I've been wrestling with the concept of integrating something so potentially fragile into such a permanent placement. "Fragile" is an overstatement. These things are pretty sturdy, but not indestructible. I started envisioning a mover carrying a tall piece of furniture through the house and whacking the beam. (Yes, I've been daydreaming about the day when we finally get our real furniture out of storage.) That would suck bad. So, it's gone.
The other issue is even more significant. Our original plan called for two load-bearing columns under this beam, one on either side of a cabinet that separates the kitchen from the family room. During framing I decided that I wanted to have the flexibility of deciding later whether we really wanted those columns, so the laminiated beam (actually paired "beams") were beefed up to carry the full span. Then if we wanted to add columns later, they could be purely aesthetic. It seemed like a good idea to have the option. Well, in the course of doing trim work upstairs I started to notice that a couple door headers were slightly out of level. At first I thought it must be sloppy framing, but that seemed out of character for our framers. More suspect was the beam. Sure enough, the beam is down 9/16" at the center of the span. So the load-bearing columns are definitely back in the picture.
After conferring with the builder yesterday, I decided to try to take at least some of the sag out of the beam before placing the columns. So with a house jack and a 6X6 post I started slowly raising the center of the beam.
The biggest problem with this is that we have a set of French doors right above this beam, leading from the master bedroom to the screened porch. I knew that the potential was huge for throwing these out of whack. Sure enough, after raising the beam 1/4" the doors will no longer close because they have spread apart in the center. The beam had obviously already sagged when the doors were installed. So my only option is to drop the beam back down to its sagged position and put in the two columns to keep the sag from advancing. Once it's all trimmed out, you'll never see the sag. Kinda stinks to have this with new construction. But on the bright side...it'll match the rest of the house beautifully.
Also on the bright side, we are back to really liking the idea of having the columns. As we worked around the temporary jack post today we kept noticing how we liked having it there. In fact, we liked it so much that our "columns" are actually going to be 6X6 fir posts. It seems like the perfect size for the space.
Anyway, bye-bye faux beam. Looks like I'll be boxing it in.
I've officially moved downstairs now and am starting door jambs. That's good news. And Gay...
She's finding plenty to do too. -- Bill
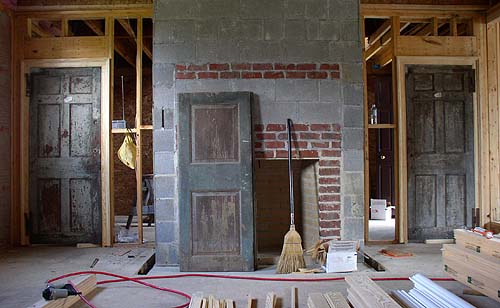
It was fun to start work downstairs today and catch a glimpse of things to come. I brought in the doors that will connect the hall and family room. These six-panel "cross doors" (and a matching third door which we will use for the downstairs bath) are, I believe, among the oldest of our old door collection.
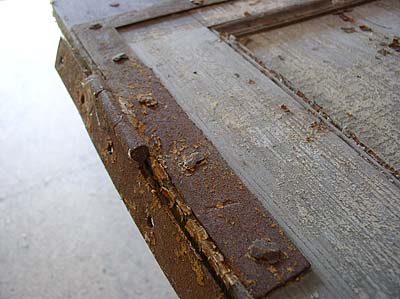
They all still have their HL hinges and at least some components of the old thumblatches. The hammered nail heads are really cool.
It's amazing that these doors are in really good shape and will require little or no squaring. They're also relatively thin (1-1/4"), but haven't warped or twisted at all. Basically, they need scraping and painting.
I built the door jambs and trimmed it all out, then couldn't resist setting the doors in place and standing back for a look.
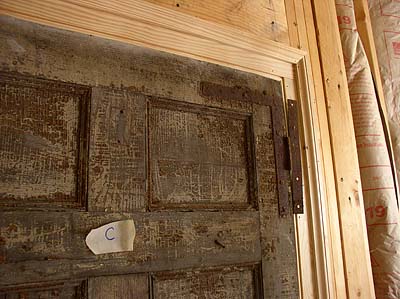
I wish we could just scrape off the loose paint and then leave the doors as they are. Gay and I discussed this, but decided that there really isn't any way to do this and have the doors look good against freshly painted, new trim.
If you're wondering about the "C" taped on the door, it's part of my system for keeping all of the doors straight. Way back when I inventoried all of the old doors in the chicken house, I assigned each a letter and created a sheet for each with detail photos, dimensions, hinge side, and other notes. Once I had the sheets, I rarely had to return to the actual doors. Working from the sheets I decided where each door was to go in the addition and how big the rough openings needed to be framed.

Once I got into building the actual jambs I started bringing the doors into the house one by one to examine them more closely and determine what work they would need and what their final dimensions would be should I need to do any squaring or trimming. For the most part, I am trying to keep trimming to a minimal so that I can maintain the old edges, instead of having freshly cut edges. But if I do determine that trimming is necessary, I mark my intentions on the sheet for the door so that when I get ready to actually work on the doors (which could be months from now) I can remember what I was thinking. Anyway, this system has worked great. Don't know what I would do if these sheets suddenly dissapeared! -- Bill
Although we haven't been posting much, we have been working...much
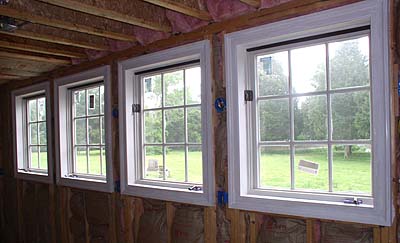
As of yesterday, all of the windows are trimmed out! I've spent most of this week trimming out the Jeld-Wen windows in the kitchen and downstairs bath. This was time consuming because I had to build jamb extensions for all of them....all 9 of them. After that, it went pretty quickly.
The kitchen windows look really good. These are four of the 7 windows in the kitchen.
I also put in the new posts to support the sagging beam.
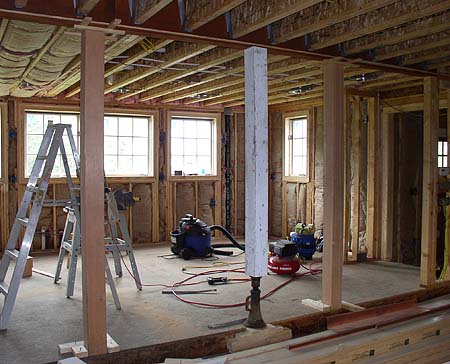
It was a little bit of a trick to tackle this job by myself. I raised the beam to 1/16th inch higher than the new posts so that I could slip them into place without banging on them. Then to make sure that they both stayed level while I lowered the beam I had to brace the top and bottom of each.
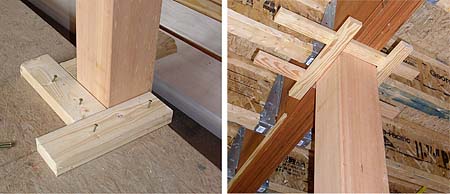
I first marked on the floor where each post base needed to sit and then nailed down three 2X4 scraps to cordon off the area. Then I placed the post into position and moved to the top. I leveled the post in each direction, building a cage around the top as I went. (The first two pieces of the cage were nailed to the beam, and then the next two were nailed to the first two.) When everything was leveled, I lowered the beam and removed the temporary jack. Voila. I actually got the right side of the beam pretty daggone close to level, but the left is still a little down so that the second floor French doors close properly. It's all good.
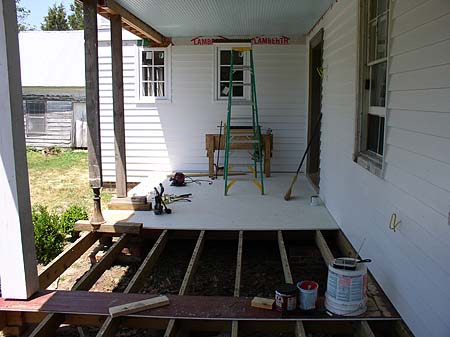
Since we've made good progress inside I think we're going to move outside and work on the porch floors this weekend.
Oh, just noticed that photo of our wildflowers (above). Did you know that daisies stink? Boy, DO they stink! William and I kept accusing each other of having stinky feet at the table until we finally figured out it was the daisies. That whole "fresh as a daisy" thing is...well...it's bogus! -- Bill
Working on the back porch floor seems to be a Memorial Day weekend tradition for me. Five years ago we reframed the porch floor and put down new flooring. With less than stellar results. The new porch boards didn't last long at all. Five years later, they were totally rotted on the outside edge. I tended to blame this on the installation...mainly that we didn't allow enough room for the boards to expand. But I no longer believe that to be true. I just think that the yellow pine boards were...well...crap.
This time I researched flooring options to death...both wood and synthetic. Nothing seemed foolproof. Finally I settled on 7/8" Southern Pine tongue & groove boards that have been kiln dried, treated, kiln-dried again, and then primed on all sides. According to our lumberyard, this product has been used succesfully in our area where other materials have failed.
Still, I wanted to make sure that I installed it to the letter. I downloaded the Southern Pine Council's installation guide and couldn't find any information about spacing the boards, other than leaving a 1/2" gap where the boards meet the house. So I called their technical support line. The tech, of course, referred me to the publication. I explained that I had read the pub, but it didn't address whether the boards should be gapped or installed right up to each other. He started babbling in vagueries, dancing around the question without ever answering it. When I pressed him he finally confessed that he couldn't answer my question, "Because if we were to give a customer a recommendation on this and then they had a problem it would become our problem." (The Council seriously needs to send this gentleman to some PR training.)
"Well if I were to gap them, can you even give me a range of what might be typical?" Nope. Couldn't do that. Too many variables.
This phone call was making me feel less than confident in my flooring choice.
Then he changed the subject and told me that they do recommend that you paint the already-treated, already-primed tongues and grooves as you install them to further seal the boards and prevent any moisture aborption. Boy, can you imagine the mess that would be?? Since you install these boards by working away from yourself, standing on the new boards that you just installed, there would be dirt-grabbing paint footprints everywhere that would probably still be visible in the final coat.
The next day I was at the lumberyard (Lamberth's - my home away from home) and saw the gentleman who recommended this product. I asked him about gapping the boards. He said that he wouldn't. "One of the curfs is cut shorter to allow for expansion." Then I asked him about painting the tongues and grooves. "I sure wouldn't do that. Then you're making them even tighter, which will allow even less room for expansion, which may cause you just the problems you're trying to avoid."
Who's right? Who the heck knows. The only thing that I know is that when it comes to tongue & groove porch flooring, there are no perfect answers or perfect products. And it's a subject everybody's scared to death of. In fact, if you search the This Old House Web site for "porch flooring" you won't find a single article that evaluates the options and makes recommendations. Nobody wants to touch it with a ten-foot pole. So we're on our own to do the best research we can to try to pick the best product for our particular area and weather conditions, make our best judgements about installation, and then the only thing left is prayer.
So I proceeded with installation, deciding to heed the advice of the man who sold me the material. After all, I know where he lives.
Installation started very badly. I plopped the first 10-foot board down on the new end of the 9'8" porch and wondered why the heck it was too short to overhang properly. Long story short...the mason built the new porch pier in the wrong place, Bill didn't catch it, and the framers built to it without saying anything. Even though this meant that the new framing met the old framing at an angle and the porch depth grows as it approaches the kitchen wall. Again, long story short...I modified the framing over the new pier to buy 3/4" and then pulled a line across the face of the porch and firred out to it so that the new skirt board will actually follow one plane. Then I was back in business.
While all this was going on, William and Gay had removed the old boards.

The installation went smoothly, only slowing each time I reached a post.
My intent had been to support the porch roof with angled braces going out into the yard, but Greg at The Petch House recently worked on his porch and braced it from inside the porch, giving me the idea to do the same. I have to brace on both sides of each post because the timbers on top of the post are shiplapped and I'm not sure the bottom lap will really carry the weight of the adjoining timber without some support from below. Anyway, I jacked the roof and took the first post all the way out. After the new boards were installed we put two coats of paint on the new floor where the post would sit, and then put the post back in place and moved on.
The second post actually lifted with the porch roof. It dangled about a half inch above the porch so I was able to work around and under it...carefully swinging it out of the way to nail the new boards, paint, etc.
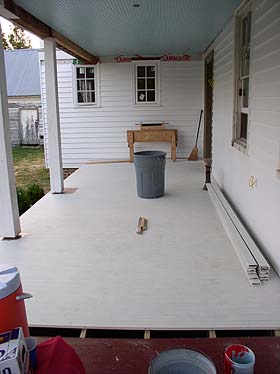
I didn't get to finish the floor because I eventually ran out of acceptable boards. In the end I had a reject pile of 33 boards (20% of the total) with conditions like this.
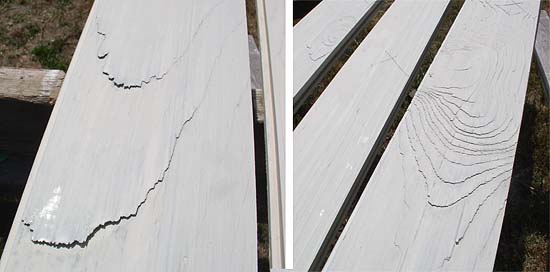
I'm sure this is caused by being kiln-dried twice, but it's sure not something you would want to walk on in bare feet! I had seen this when I took delivery of the boards a month ago and let the lumberyard know that I was going to be rejecting a fair number of the boards. "No problem. Just let me know what you need," they said. So I don't foresee any problems, just a delay in finishing the job. -- Bill
|