
 When you see this symbol, click to read related discussion in the Forum. When you see this symbol, click to read related discussion in the Forum.
Wow, my posts have really been few and far between lately. I've been getting emails asking if we've dropped off the face of the earth or been kidnapped.
Posts have been scarce because work on the house has been scarce. And boy that's been nice. Instead of our summer being spent ticking off projects around the house, we've completely ignored that long to-do list and have been spending time enjoying life in the beautiful Northern Neck of Virginia. It's been very nice. Of course, I've also been working during the week, unlike the previous couple years where it was all Enon Hall, all the time. Now, the pace is more like normal people do it. A project here and there on the weekends...if we're lucky.
And there have been a couple projects lately...
Nasty smelling hot water. We learned a long time ago that the likely source is the anode rod in your hot water heater. The anode rod is a sacrificial rod, usually made of magnesium. The concept is that it corrodes, instead of the tank itself. But, when combined with well water it can sometimes create hot water that smells like rotten eggs. We went through this before. The only solution was to remove the anode rod. This dramatically shortens the life of the hot water heater...but it immediately gets rid of the nasty smell. About a month ago the hot water in the Dutch Colonial got that rotten egg smell. The tank is only 10 months old now. Our old tank had died at the worst possible time. The new tankless hot water heaters weren't yet online, so we were faced with either going about 3 weeks without hot water, or going ahead and replacing the dead hot water heater. Which we did. So we have a new hot water tank for the bath and a half in the old part of the house and two tankless hot water heaters in the addition.
So here's how to replace (or remove) the anode rod in a hot water heater.
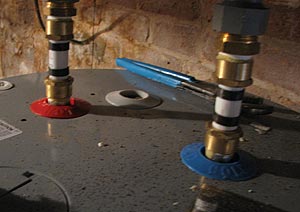
The anode rod is usually about 3/4 as long as the tank is tall and screws right into the top of the tank. On our tank it's right between the cold water inlet and hot water outlet. Before removing the anode rod you need to turn off the power to the tank, shut off the water line going into the tank, and release the water pressure in the tank. Release the water pressure by opening the highest hot water faucet in the house. You just want to make sure that you don't have hot water spraying in your face when you start loosening the anode rod.
Once this is done you can remove the rod. On our tank there is a plastic trim piece that goes around the top of the rod. You can remove this by prying it straight up with a flathead screwdriver. Once it's out of the way you have clear access to the top of the anode rod, which looks like the top of a large bolt. I needed to go buy a 1-1/16" wrench to fit ours. Once you've unscrewed the rod, you can pull it straight up out of the top of the tank. It'll be all funky with corrosion.

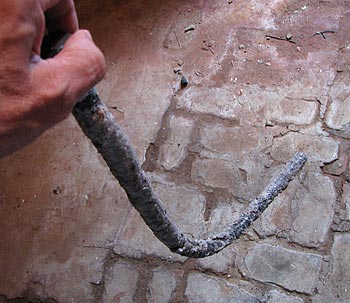
In our situation, we don't have enough headroom above the tank to pull the rod straight out. Instead, I had to pull it up as far as I could, then bend the rod and then pull it out the rest of the way.
To replace the rod, just drop your new rod into the tank and tighten it up. In our case, we've learned that replacing the rod (even with a different sacrificial metal) still results in nasty-smelling hot water in about a month. So we have to leave the rod out. So I used a hacksaw to cut the rod off of the top section that screws into the tank. The result is a plug that can be used to close up the hole in the top of the tank. But first, pour a quart or two of chlorine bleach into the hole to kill the bacteria that's been causing the smell. Then screw in the plug and turn the water and power back on. (And turn off that faucet you turned on earlier.) Let the bleach sit in the tank for 24 hours. Then run your hot water faucets until you no longer smell bleach and you'll be good to go. Until your tank rusts through because you pulled out the anode rod...
I figure we now have about three years to get the two old bathrooms hooked up to the new tankless hot water heaters and do away with the hot water tank.
Abrupt subject change...
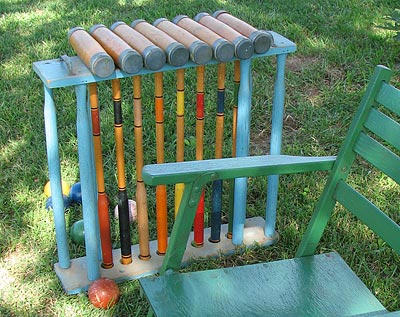
New croquet sets suck! A couple years ago Gay and William bought me a croquet set from Brookstone for Father's Day. It was supposed to be a nice set, but the mallets just couldn't stand up to the abuse of actually hitting croquet balls. I was constantly having to rehab all of the mallets, re-tightening all of the metal rings, etc. It was a pain. Last month I saw a great old set in an antique store and quickly bought it for Gay and William to give to me for my birthday. It's awesome! Heavy-duty and built to actually survive the game! So if you're ever in the market for a croquet set, track down an old set!
Which brings us up to today's house project.
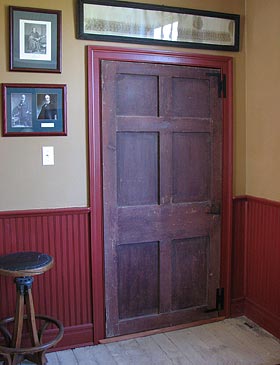
I woke up this morning thinking, this is the day that William will finally get a bedroom door. Not just a door leaning against the wall in his bedroom. (He's had that for several months now.) But a door that is actually hung on hinges and opens and closes!
If you got back to April 29th of this year you'll see a photo of Gay modeling William's bedroom door. It looked great, but we were trying to determine how to keep its chipping paint patina without winding up with lead paint dust everywhere. Well, this morning I just gently scraped all the chipping paint off and scrubbed the door down good with TSP. When I was done, the door still had a great, old patina.
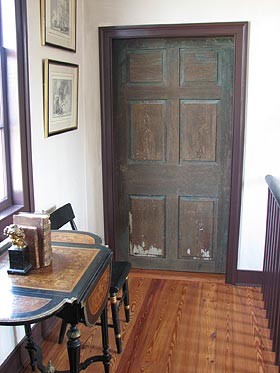
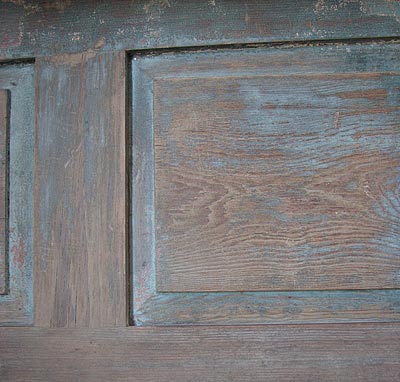
The back side of this door has faux-painted raised panels. The faux work is barely visible anymore.
I had to reverse this door, which meant removing the old keyhole latch. (There were no hinges remaining on this door.) And the old latch needs restoration and is missing some parts, like the keep and sliding bolt.
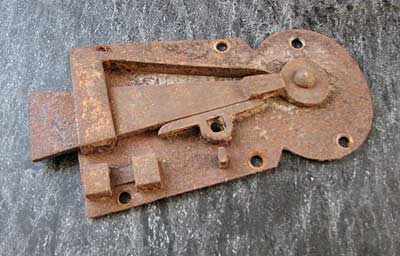
I may contact Ed Donaldson to see how much he would charge to restore it. Here's an example of a similar restored latch.
Interestingly, our keyhole latch is a left-hand latch, which was installed upside down on the right hand side of the door. So when it's restored and reinstalled on the left side it will actually be right-side-up for the first time in 200 years or more.-- Bill
Cool! We and some other housebloggers are featured in today's Wall Street Journal. -- Bill
Some small things are happening and one big project is getting ready to kick off around here.
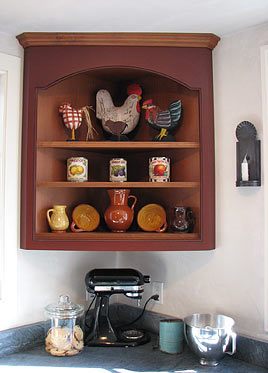
After almost a year, (sheesh, that's embarassing) I finally put the crown moulding up around the tops of the two corner cabinets in the kitchen.
Why'd it take so long for me to get to this? Basic avoidance I guess. The miter angles aren't 90 degrees, so I knew there'd be some math and head sratching involved. So I just steered clear. But it's amazing how knocking out one little project that you've been avoiding can suddenly get the juices flowing and get me thinking about tackling all sorts of other things on the to-do list...large and small.
Like...beginning construction of our built-in bookcases in the family room. This entire 17-foot wall is devoted to bookcases.
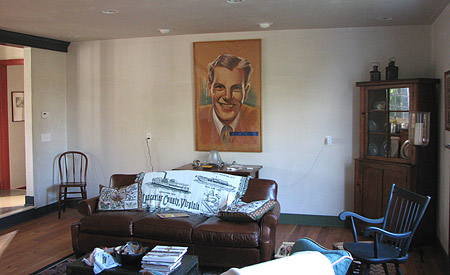
That's why it looks so blank right now. (And why those outlets are positioned so far up the wall.) My plan has been to model these bookcases after the ones that the previous owner built in the Dutch Colonial. We have decided that the bookcases should go from floor to ceiling, instead of sitting on base cabinets. Cabinets would sure be useful, but we already have cabinets in the family room for the TV and cabinets in the adjoining kitchen. Adding more would just make it look like "cabinet world."
Another consideration is that we want to incorporate room for an existing, large piece of art.
I came up with two options.
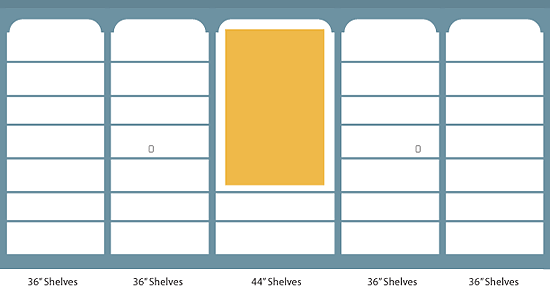
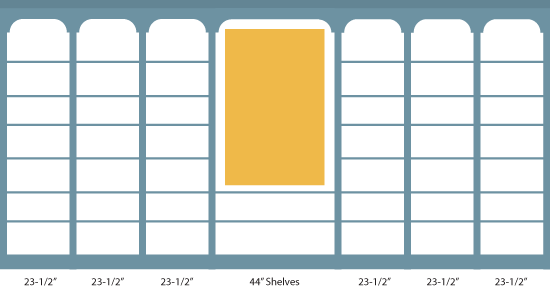
The artwork is obviously narrowing our options. In the top option, we wind up with a fairly wide shelf span which means that I will need to be concerned about deflection (sagging) when the shelves are loaded down with books. And we have a lot of books. The bottom option eliminates the sag issue but is probably going to be just too darn busy with so many sections. And more expensive to build. In both options, the center shelves (at 44") are way too wide be loaded down with books. If we ever tired of the artwork and wanted to just fill in with shelves, that middle section would need to be reserved for framed photos, ceramics, etc.
So, I think we're going with the top option. I will be building the cases out of 3/4" finish plywood with a birch veneer. (Everything will be painted when it's done.) I will also use this for the shelves but will apply a hardwood nosing to stiffen them up. The shelves will also be installed the old way, sitting on cleats on both sides and the back. I think that this will give them enough support to prevent sagging. The challenge will be securing all of those back cleats into studs. I'm halfway considering sheathing the entire wall with 3/4 plywood before I do anything to give me good, continuous base for anchoring. Overkill?
The bookcases will be easy to build and should come together pretty quickly. The hard part will be the bead detail on the top radii. Mr. Hayden (the previous owner) obviously used a moulding plane to make his beads by hand. I love the handcrafted look. But then it does feel a little odd beside the machined crown moulding.

Either way...by hand or machine...how the heck would I turn those corners with the bead? Apply the bead? It's almost like Mr. Hayden's is more of a scribe line than an actual bead... Sorry, thinking out loud.
Anyway, I may have some time to get started on this project this week.
While looking for photos of bookcases, I ran across this photo in one of our books.
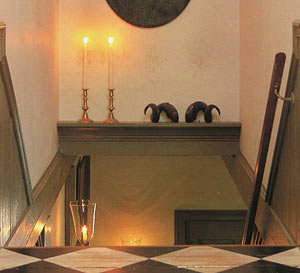
I love all the little details that are only found in old houses. Like that cool little ledge overhead as you go down this staircase. I immediately had to add one to our rear staircase that goes up to my workshop.
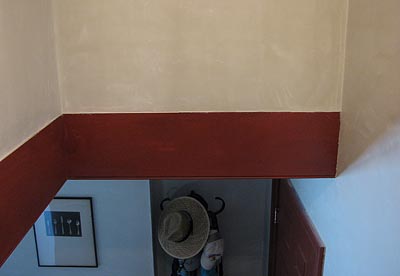
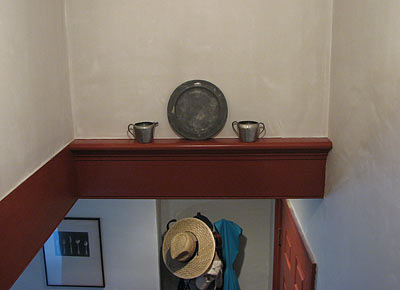
I used scrap pieces of nosing and bed moulding and had a great old house detail in under an hour. Now I just need to make a peg rail to replace that hall tree at the bottom of the steps... -- Bill
|